SD cards are delicate and are commonly found in many different gadgets such as digital cameras, camcorders, smartphones, gaming consoles, GPS devices, drones, and car dash cams.
This makes them prone to getting damaged and losing data. When we use them a lot, there's also a higher chance of us making mistakes that could cause problems.
It's really annoying when you lose important photos and videos. That's why we've created this guide to help you recover files from an SD card on a Mac.
Whether you have special recovery software or not, our simple steps will help you get your data back quickly and easily all by yourself.
How to recover deleted/lost files with specialized software
Recovering data from a memory card is a relatively simple task with the help of SD card recovery software. Typically, professional data recovery software comes equipped with a user-friendly interface designed to assist Mac users every step of the way.
For the best outcomes, we suggest using iBoysoft Data Recovery for Mac to retrieve data from an SD memory card on a Mac, whether it's a micro SD card or a full-sized SD card. To initiate the recovery process:
To recover data from your SD card on Mac using iBoysoft Data Recovery software, follow these concise steps:
Step 1 - Download the SD card recovery software from the developer’s official website and install it on your Mac, ensuring compatibility with Mac OS X 10.11 or later. Use your admin password during installation.
Step 2 - Connect the SD card: Attach the SD card to your Mac via a built-in reader, adapter, or by connecting the device (e.g., digital camera) containing the SD card.
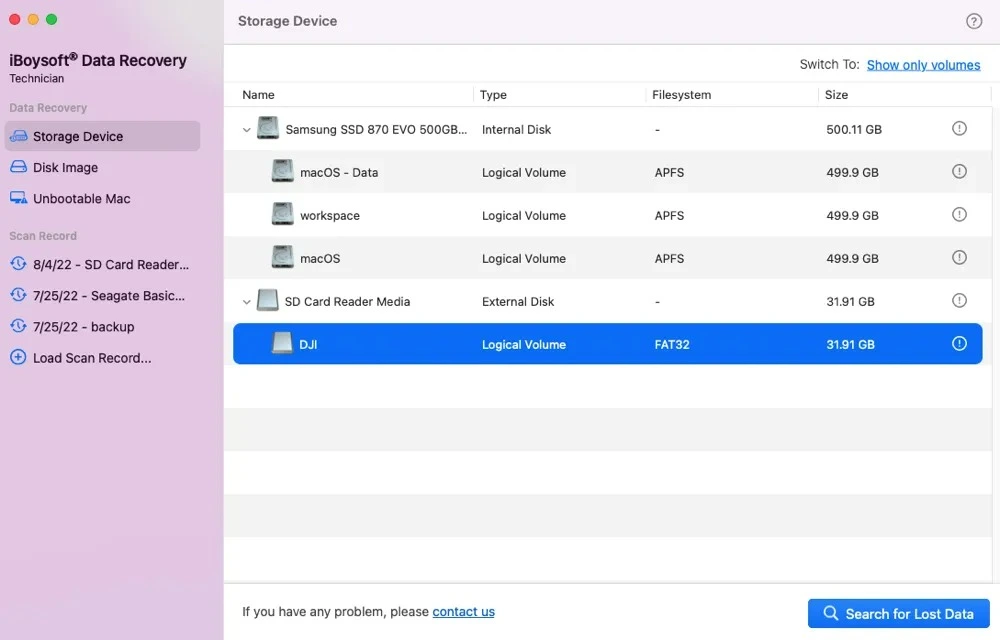
Step 3 - Launch iBoysoft Data Recovery software: Open the application, and it will detect your SD card and its partitions (check out the example image below).

Step 4 - Select scan mode: Choose your SD card and click "Search for Lost Data." iBoysoft Data Recover will immediately scan and delete the lost files rapidly and thoroughly.
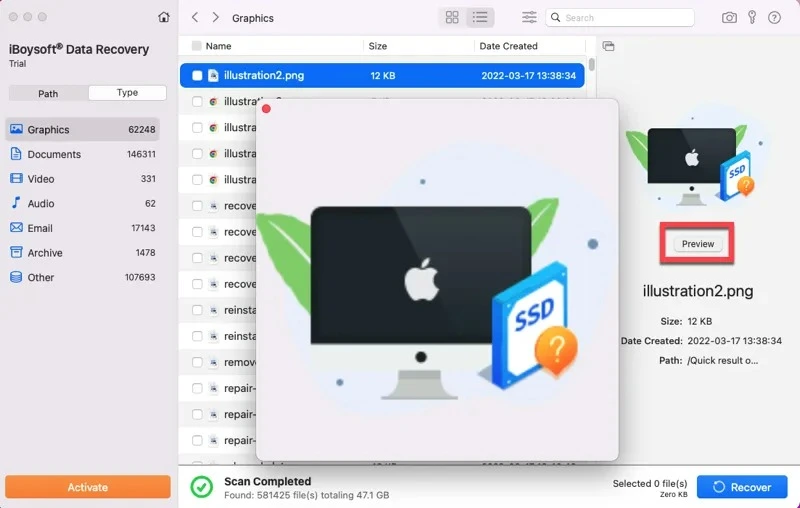
Step 5 - Preview and select files: Review recoverable files by clicking "Preview" and choose the ones you want to restore.
Step 6 - Recover files: Click "Recover" to retrieve selected files. Save them to a different location to avoid data loss. Verify the recovery and exit the iBoysoft software when done.

If you are experiencing data loss on an SD card with your Mac, iBoysoft Data Recovery for Mac offers a reliable solution. This versatile tool can retrieve over 1000 file formats from various SD memory cards, including those from popular manufacturers.
It excels at recovering permanently deleted files and lost data from SD cards commonly used in digital cameras, camcorders, CCTV (Closed-Circuit Television) systems, gaming consoles, GPS devices, drones, car dash cams, digital audio recorders, e-book readers.
It can also help you rescue data from corrupted, unreadable, or formatted SD cards. Beyond SD cards, it extends its data recovery capabilities to other disk-based storage devices like hard drives, SSDs, and USB flash drives on the Mac platform. The Windows version is also available on the developer’s official website.
How to Recover Deleted Photos from Mac Trash
On a Mac, deleted files go into the Trash folder temporarily and are permanently deleted after 30 days, or sooner if the Trash is manually emptied.
However, if data was deleted from an SD card on an externally connected device like a camera or memory card reader, it won't appear in Mac's Trash. To recover deleted files and data from an SD card on a Mac:
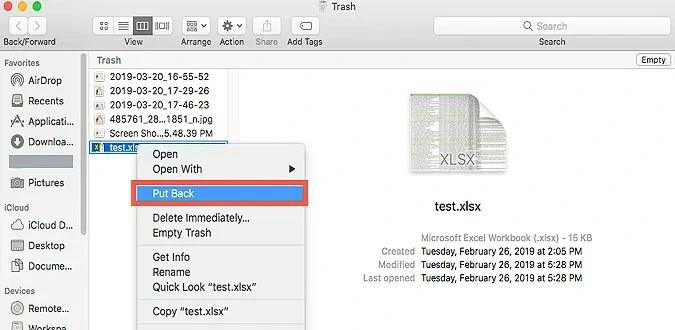
Step 1 - Open the Trash folder from the Dock.
Step 2 - Locate the deleted photos or files on the SD card that you want to recover.
Step 3 - Right-click on the selected files and choose "Put Back."

Please note that the recovered photos or videos from the SD card will be restored to their original folder, so ensure the SD card is connected to your Mac before attempting recovery.
Recovering Data from SD Card Using Time Machine Backup
Time Machine is a native backup and recovery tool found on Mac computers, designed to back up system files, applications, data on the main disk, and data from external drives connected to the Mac.
If you've previously backed up your data with Time Machine, you can utilize it to restore lost files from an SD card. Here's how to do it:
Step 1 - Connect to the external hard drive containing the Time Machine backup to your Mac.
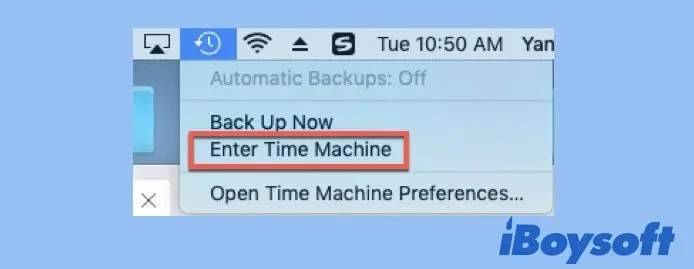
Step 2 - Click on the Time Machine icon located in the menu bar and select "Enter Time Machine." If the Time Machine icon isn't visible, go to the Apple logo > System Preferences > Time Machine and check the "Show Time Machine in Menu bar" option.

Step 3 - In the Finder window, choose the folder that last contained the deleted files. If no Finder folder is open, the desktop folder will be displayed by default.
Step 4 - Use the on-screen up and down arrows or the timeline at the right edge of the screen to locate older versions of the items you wish to restore.
Step 5 - Select the item for recovery, press the Spacebar to preview it, and then click "Restore" to finalize the recovery process."
Recovering Data from SD Card Using Alternative Backup Methods
When you lose data from your SD card, you can get it back from a backup you made earlier, either on an external device or in the cloud.
How you do this depends on the backup method you use. To get your data back, you need to find the backup, locate your files in it, and then follow the instructions provided by the backup system to finish the recovery.
It's important to know that different backup systems have different ways of restoring data, so make sure you understand how your chosen system works before you start.
Having a backup of your data is like having a safety net for when you lose important files – it makes it easy to get them back quickly.